Programming on the go has never been easier for electronics enthusiasts. The ArduinoDroid Arduino ESP IDE MOD APK Premium Unlocked is a comprehensive integrated development environment (IDE) that allows you to write, compile, and upload sketches directly from your Android device. By using the Premium Unlocked version, you gain access to “Code Complete” (autofill), advanced diagnostics, and a variety of editor themes, all while removing distracting advertisements. In this guide, we will provide the full navigation paths to every feature to help you master mobile firmware development for Arduino and ESP boards.
What is ArduinoDroid Arduino ESP IDE?
ArduinoDroid (originally available at https://play.google.com/store/apps/details?id=name.antonsmirnov.android.arduinodroid2) is a standalone mobile IDE. Unlike many other apps, it does not require an internet connection or cloud service because it contains a local compiler and uploader for AVR and ESP8266/ESP32 chips. The MOD APK Premium Unlocked version is essential for serious coders as it unlocks the Smart Keyboard and Real-time Diagnostics, which are critical for catching syntax errors before you hit the compile button.
Why Use a Mobile IDE for ESP32 and Arduino?
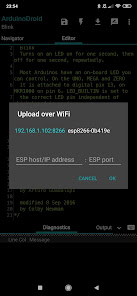
Carrying a laptop into the field or a cramped workshop isn’t always practical. ArduinoDroid allows you to perform “Over-the-Air” (OTA) updates for ESP boards or use a simple USB-OTG cable to flash an Arduino Uno. With the 2026 updates, the app now supports the latest libraries and boards, making it a powerful replacement for the desktop IDE during rapid prototyping.
Top Features of the Premium Unlocked Version
The Premium Unlocked edition provides professional-grade tools that simplify the coding process on a smaller screen:
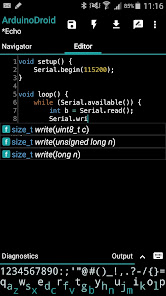
- Code Complete: A “smart” engine that suggests functions, variables, and keywords as you type to speed up development.
- Real-Time Diagnostics: Instantly underlines errors and warnings in your code with suggested fixes, just like a high-end desktop IDE.
- Advanced Themes: Choose between dark modes, solarized themes, and high-contrast layouts to reduce eye strain during long coding sessions.
- Unlimited Libraries: Easily download and manage hundreds of community-contributed libraries directly within the app.
- Dropbox & Google Drive Integration: Sync your sketches across devices so you can start a project on your PC and finish it on your phone.
- Ad-Free Workspace: No banners or pop-up videos, giving you the full screen real estate for your code.
Full Path: How to Start Coding (Step-by-Step)
If you are a beginner, setting up a mobile compiler can be intimidating. Follow these exact navigation paths to get your first project running:
1. Creating and Saving a New Sketch
To start your project, follow this path: Main Screen > Three Dots Menu (Top Right) > Sketch > New > Enter Project Name > Tap “Create”. To save your work manually, follow the path: Main Screen > Floppy Disk Icon (Top Bar).
2. Selecting Your Board (Arduino or ESP)
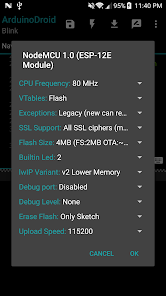
You must tell the app which board you are using. Follow this path: Three Dots Menu > Settings > Board Type > Select Category (e.g., Arduino or ESP32) > Select Model (e.g., Arduino Uno or ESP32 Dev Module). This ensures the compiler uses the correct architecture.
3. Compiling Your Code
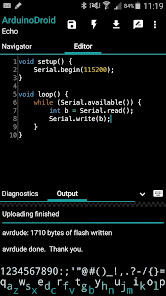
Before uploading, you must check for errors. Follow this path: Main Screen > Lightning Bolt Icon (Top Bar). The app will open the Output Console at the bottom. If it says “Compilation Finished,” your code is ready.
4. Uploading via USB-OTG
To flash the code to your board, follow this path: Connect Board via OTG Cable > Main Screen > Downward Arrow Icon (Next to Lightning Bolt) > Confirm USB Permission. The console will show the upload progress percentage.
Useful Features: Serial Monitor and Plotter
Debugging is a huge part of electronics. To view data being sent back from your Arduino (like sensor readings), follow this path: Main Screen > Monitor Icon (Top Right) > Select Baud Rate (e.g., 9600) > Tap “Connect”. This allows you to see the real-time output of your `Serial.print()` commands.
Managing Libraries
If your project requires a specific library (like a sensor driver), follow the path: Three Dots Menu > Sketch > Libraries > Manage Libraries > Search for Library > Tap “Install”. Once installed, you can include it in your code using the `#include` directive.
Hardware Requirements for Mobile Coding
To use ArduinoDroid MOD APK successfully, you will need a few physical components:
- USB-OTG Adapter: To connect your phone’s Type-C or Micro-USB port to the board’s USB cable.
- Internal Storage: The app requires about 500MB of space to store the local compilers (AVR/ESP).
- USB Host Support: Ensure your Android device supports “USB Host” mode (most modern phones do).
Safety and Data Privacy
ArduinoDroid works entirely offline, meaning your source code never has to leave your device. For those using the Premium version with cloud syncing, follow the path: Three Dots Menu > Settings > Cloud > Account to manage which folders are synced. To keep the app running fast, periodically follow the path: Main Screen > Settings > Clear Cache to remove old temporary build files.
Conclusion
The ArduinoDroid Arduino ESP IDE MOD APK Premium Unlocked is an essential tool for the modern maker. By bringing the full power of a C++ compiler and uploader to your pocket, it removes the barriers between inspiration and implementation. Whether you are debugging a smart home sensor or teaching a robotics class, this app provides the professional features needed to succeed. By following the full navigation paths provided in this guide—from selecting your board to using the serial monitor—you can turn your Android device into a professional workstation. Start building the future, one line of code at a time!